Posts

Showing posts from December, 2017

Global Light Rig

Image
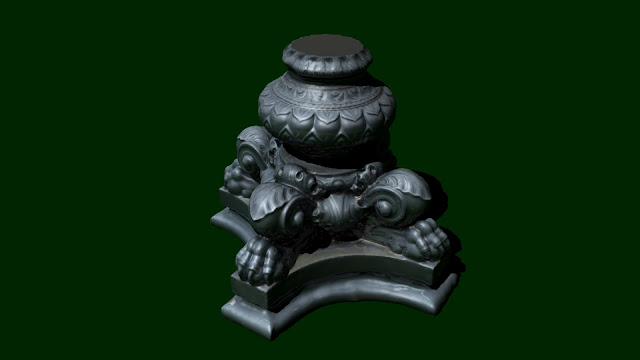
Hello again! A lot of posts today. What a surprise...! This assignment is for Advanced Lighting and Rendering class. We were made to setup a lighting rig using directional lights with less intensity at different angles. I kept 20 directional lights on top and called them SKY LIGHT and 20 directional lights on the bottom and called them GROUND LIGHT. This setup gives a soft light and shadow. Take a look at the results: This render is with Maya's default light. I have not setup any light yet: Here is the render with global light rig setup. You can see a soft light being produced: Here is the render output which is got with the global light rig and a directional light. You can now see a soft light in the previously dark area. A shadow with faded edges can be seen: Model credits goes to Thomas Flynn, you can find the LAMP POST MODEL here: Lamp Post Detail, British Museum That's all for now! Thanks for visiting! Bye!! ~~

Cambot Character Rigging

Image
Hello everyone! Here is another character rig. We were given a character called Cambot and told to rig it using the letters of our name as curves. We used IK handles for the legs and Blend shape to give expressions. It was fun. Here are some screenshots: Here is the final output video: Hope you like it! Thanks for visiting! Bye...! ~~~~~~~Chinmayee. S

Simple Tie Rig

Image
Hello! This is a small and simple rigging assignment. We were made to rig a tie and make it roll and move around. Here is the final output: Hope you like it! Thanks for visiting! Bye...! ~~~~~~~Chinmayee. S

Bouncing Ball 3D Animation

Image
Hello Everyone! This is my first 3D animation. Ball bounce is the animation which forms the basis of all other animations. We were given a ball that was already rigged and told to animate ball bounce. This ball had 4 controls: 1. up_ctrl (stretch and squash control 1) 2. transform_ctrl 3. down_ctrl (stretch and squash control 2) 4. COG_ctrl Using the Transform control, you can move the ball around. I moved the ball in X-axis and made it bounce on Y-axis. Then I made it rotate in the Z-axis. Here is the graph for the Transform control: X-axis: Y-axis: Z-axis: Using the steep-to-curve and curve-to-steep method, editing the graph gave slow in and slow out effect. The Stretch and Squash controls helps you to give the ball the stretch and squash effect, making it look more appealing. Here are the graphs for the controls: Up control X-axis: Up control Y-axis: Down control X-axis: Down control Y-axis: